
|
|
Nick Agler
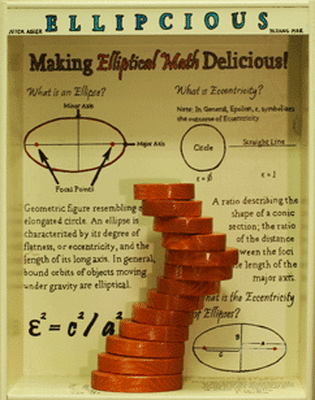
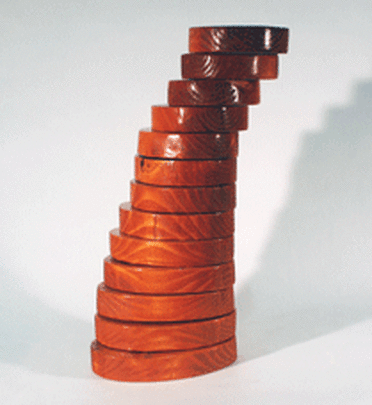
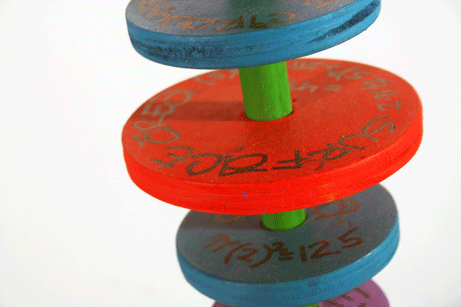
Our sculpture consisted of a stack of spiraling ellipses made out of wood that became less and less eccentric as the stack grew higher. While brainstorming ideas on the best way to stack them, we came up with several options but quickly narrowed it down to just one. Our original idea was to just align the center of each ellipse on top of one another with each successive ellipse rotated at a certain degree. This would create a sort of fluidity when looking at it and would finish nicely with a circular ellipse at the top. However We ended up changing our plan once we had cut out all the ellipses seeing how much nicer it looked when we aligned the ellipses toward the side. This looked like a spiraling staircase and also had the same fluid appearance. After consulting with Andrew about our new idea we took home our ellipses and applied wood stain to improve the color. The final step we took was drilling holes in each of the ellipses so we would be able to slip a dowel inside, keeping them all straight and together. The dowel also allowed us to spin the ellipses at a variety of angles making our project very fun to interact with. The math pertaining to our sculpture is strictly elliptical, the mainstay being the role of eccentricity. Eccentricity is basically a measure of how stretched out an ellipse is. A circle has an eccentricity of zero, while a flat line has an eccentricity of one. This project came out incredibly well and is definitely one of the nicer looking projects we’ve completed.
Our sculpture consisted of a stack of spiraling ellipses made out of wood that became less and less eccentric as the stack grew higher. While brainstorming ideas on the best way to stack them, we came up with several options but quickly narrowed it down to just one. Our original idea was to just align the center of each ellipse on top of one another with each successive ellipse rotated at a certain degree. This would create a sort of fluidity when looking at it and would finish nicely with a circular ellipse at the top. However We ended up changing our plan once we had cut out all the ellipses seeing how much nicer it looked when we aligned the ellipses toward the side. This looked like a spiraling staircase and also had the same fluid appearance. After consulting with Andrew about our new idea we took home our ellipses and applied wood stain to improve the color. The final step we took was drilling holes in each of the ellipses so we would be able to slip a dowel inside, keeping them all straight and together. The dowel also allowed us to spin the ellipses at a variety of angles making our project very fun to interact with. The math pertaining to our sculpture is strictly elliptical, the mainstay being the role of eccentricity. Eccentricity is basically a measure of how stretched out an ellipse is. A circle has an eccentricity of zero, while a flat line has an eccentricity of one. This project came out incredibly well and is definitely one of the nicer looking projects we’ve completed.
Raquel Morris
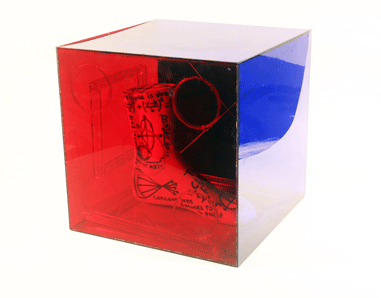
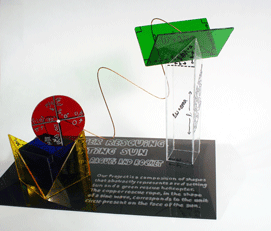
Our sculpture is an abstract representation of a helicopter rescuing a sun that is setting. The green figure resting on the clear object represents the helicopter and the red circle represents the sun. The circle is on a blue and yellow figure that represents the water and sand of the ocean. The copper wire is the rescue rope but we have it bent in a sine wave. The sine wave corresponds to the information on the red circle/ unit circle. We have them connected because the math in both these figures are directly related. Because of all the other abstract shapes in our sculpture we were able to include information about finding the volume and surface area of a cube, triangular prism, rectangular prism, etc. Initially we could not figure out what to make for our sculpture and we took a lot of time brainstorming. In the end we decided to use our paper sculptures made prior to the project and combine our two ideas. In the end it was easy to join our two pieces and make it look as though they fit perfectly together. If we were to do this sculpture again we this we would have found a better way to glue the pieces together because the glue we used now dripped and caused some sections of my project to look a little messy. Overall, we think the sculpture came out very nice and looks much better than we originally expected when we made our paper model.
Our sculpture is an abstract representation of a helicopter rescuing a sun that is setting. The green figure resting on the clear object represents the helicopter and the red circle represents the sun. The circle is on a blue and yellow figure that represents the water and sand of the ocean. The copper wire is the rescue rope but we have it bent in a sine wave. The sine wave corresponds to the information on the red circle/ unit circle. We have them connected because the math in both these figures are directly related. Because of all the other abstract shapes in our sculpture we were able to include information about finding the volume and surface area of a cube, triangular prism, rectangular prism, etc. Initially we could not figure out what to make for our sculpture and we took a lot of time brainstorming. In the end we decided to use our paper sculptures made prior to the project and combine our two ideas. In the end it was easy to join our two pieces and make it look as though they fit perfectly together. If we were to do this sculpture again we this we would have found a better way to glue the pieces together because the glue we used now dripped and caused some sections of my project to look a little messy. Overall, we think the sculpture came out very nice and looks much better than we originally expected when we made our paper model.
Courtney and Bev
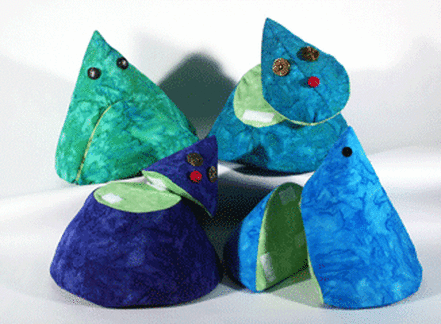
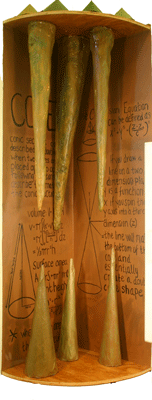
Within the Calculicious project, each person had to make a watercolor, a painting, and then a sculpture which combined both math and Calculus. Originally, we were going to make a mobius strip, and work with math involving infinity, however, the teachers felt it would be a good idea to assign us a project which another group was struggling to make, and we would be good at. So we ran with the idea of huggable and plush conic sections. After only a few weeks of work, we came out with our four cones, Hugo, Evans, Colin, and Prongs. Within the cones, there is a lot of math. All planes that intersect a cone create a circle, ellipse, parabola or a hyperbola (conic sections). Cone Buddies can show the four different conic sections. The purpose is to make it kid-friendly. On each on the tag explains the math for the specific shape. Colin the Circle explains that when a plane parallel to the base intersects a cone a circle is formed also that a circle is all the points a constant distance from a point. Evans the Ellipse explains that when a plane intersects the two sides of a cone the intersection forms an ellipse. An ellipse is the shape formed by the set of all points were 1 = a2 / x2 + b2 / y2. Prongs the Parabola shows the math that when a plane parallel to the edge intersects the cone a parabola is formed. It also explains that a parabola is made when y = a2x + bx + c. Hugo the hyperbola explains that when a plane that intersects the base and is not parallel to the side a hyperbola is formed with an equation of 1 = a2 / x2 - b2 / y2. The equations for the patterns were found and then graphed on Geometer’s sketch pad. These were then printed out and traced onto the fabric and cut out and then sewn mostly together. Plastic bases were put inside, then they were stuffed and then the sewing was completed.
The net of a cone with slant height R and a radius of the base of the
circle equal to R/2 has an equation r=R when 0<θ<π. When a plane
parallel to the base of the cone intersects the cone a circle conic
section is created. The net for making the two parts of the circle
conic section with the circle half way up would be r=R and r=R/2 when
0<θ<π. When a plane perpendicular to the base of the cone a
hyperbolic conic section is made. The net for making the two parts of
the hyperbola conic section with the hyperbola one half of the way up
the side would be r=R and r=R/(2*cos(2θ)) when 0<θ<π. . A plane
parallel to the slant intersecting a cone will create a parabolic
conic section. The net for the parabolic conic section with the
parabola starting half way down the side would be r=R and r=R/(cos(2θ)
when 0<θ<π. ). Any other type of plane with intersect the cone and
create an elliptical conic section. The net for making the ellipse
with a plain that is perpendicular to the slant would be r=R and
r=(R/2)*1/(1-((cos2θ)/3)) when 0<θ<π. The tags and faces were attached and then they were complete. This project has given our group a better appreciation of seamstresses, as well as a better understanding of how conic sections work.
|
|
|
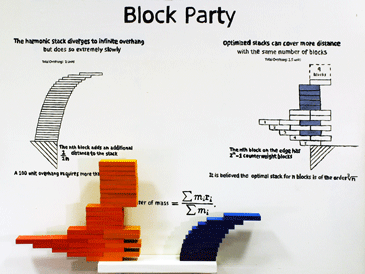
Carl, Brad and Sam
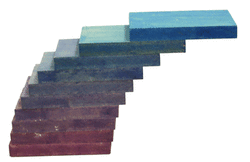
How far can a tower of blocks hang over the edge of a table before it collapses? Like other apparently simple problems, the solution to the block stacking question is far from simple. In a singlewide stack, the problem must be tackled in a unique way. By approaching the problem from the top of the stack, rather than the bottom, one can calculate the relative overhang of each block with ease. One must merely find the center of mass in a single dimension. If half of the mass of the tower is safely resting on the table the tower will not fall. Thus, to calculate the optimal placement for a block, one must find the center of mass of the tower, and then place the next block such that half of the tower's mass is resting on the new block. If one consistantly places blocks in this manner, the center of mass of the tower can easily be located by dividing the length of the stack by two.
As one continues to add blocks to the stack, one can achieve an overhang of arbitrary length. Upon close inspection of the stack, an interesting relationship between the harmonic series and total overhang emerges. For a singlewide stack of n blocks, the maximum overhang is equal to half of the nth harmonic number. Since the harmonic series diverges to infinity as n grows, the maximum overhang for a singlewide stack is unbounded. Although the harmonic series diverges, it does so very slowly. The top block, which we will call the first block, goes out by 1/2, the second block goes out by 1/3, the third goes out by 1/4. For a 100 unit overhang, the minimum number of blocks required is greater than the number of particles in the known universe.
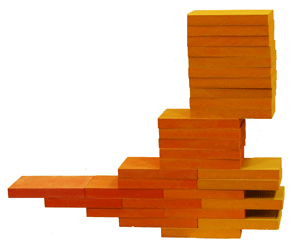
It is only natural for one to wonder if it is possible to obtain a larger overhang with the same number of blocks. One need only change the rules slightly. If multiple blocks may directly rest upon a single block, the maximum overhang increases drastically. When more freedoms are granted, the problem becomes incredibly complex. Finding the optimal stack for n blocks in a multiwide stack requires a great deal of effort. The math involved in calculating the placement of blocks in an optimal stack quickly becomes collegiate level.
How far can a tower of blocks hang over the edge of a table before it collapses? Like other apparently simple problems, the solution to the block stacking question is far from simple. In a singlewide stack, the problem must be tackled in a unique way. By approaching the problem from the top of the stack, rather than the bottom, one can calculate the relative overhang of each block with ease. One must merely find the center of mass in a single dimension. If half of the mass of the tower is safely resting on the table the tower will not fall. Thus, to calculate the optimal placement for a block, one must find the center of mass of the tower, and then place the next block such that half of the tower's mass is resting on the new block. If one consistantly places blocks in this manner, the center of mass of the tower can easily be located by dividing the length of the stack by two.
As one continues to add blocks to the stack, one can achieve an overhang of arbitrary length. Upon close inspection of the stack, an interesting relationship between the harmonic series and total overhang emerges. For a singlewide stack of n blocks, the maximum overhang is equal to half of the nth harmonic number. Since the harmonic series diverges to infinity as n grows, the maximum overhang for a singlewide stack is unbounded. Although the harmonic series diverges, it does so very slowly. The top block, which we will call the first block, goes out by 1/2, the second block goes out by 1/3, the third goes out by 1/4. For a 100 unit overhang, the minimum number of blocks required is greater than the number of particles in the known universe.
It is only natural for one to wonder if it is possible to obtain a larger overhang with the same number of blocks. One need only change the rules slightly. If multiple blocks may directly rest upon a single block, the maximum overhang increases drastically. When more freedoms are granted, the problem becomes incredibly complex. Finding the optimal stack for n blocks in a multiwide stack requires a great deal of effort. The math involved in calculating the placement of blocks in an optimal stack quickly becomes collegiate level.
|
|
Connor and Albert
The idea for our sculpture was influenced by my partner Connor Pohling and his sculpture he had done in art class. He made circle rings that would come down and attach to a cylinder. Each circle coming down would increase in size. There were a total of 12 rings. Our first idea was to make a cone out of cut out ellipses. You can cut a cone diagonally and get ellipses. So we were going to cut out about 12 of them and it would form the shape of a cone. We decided that it was going to be too hard so we decided to cut out circle instead. Circle cut out would make a cone as well so we did that instead. During the process of cutting the circles we wanted to make the sculpture not only form the shape of one cone but of three. So we had four sizes of circles we need to cut out. The sizes were 2, 3, 4, and 5 inch diameter circles. We attached the circles to a ¾ in wooden dowel. There were a total of 12 circles which each size had four of the same. The final project turned out pretty good. We sanded all the circles and painted the circles different colors. Andrew had us write the math for the circles on the actual circle and we had made a display board that showed the different conic sections, the ellipse, parabola, hyperbola and of course the circles.
The idea for our sculpture was influenced by my partner Connor Pohling and his sculpture he had done in art class. He made circle rings that would come down and attach to a cylinder. Each circle coming down would increase in size. There were a total of 12 rings. Our first idea was to make a cone out of cut out ellipses. You can cut a cone diagonally and get ellipses. So we were going to cut out about 12 of them and it would form the shape of a cone. We decided that it was going to be too hard so we decided to cut out circle instead. Circle cut out would make a cone as well so we did that instead. During the process of cutting the circles we wanted to make the sculpture not only form the shape of one cone but of three. So we had four sizes of circles we need to cut out. The sizes were 2, 3, 4, and 5 inch diameter circles. We attached the circles to a ¾ in wooden dowel. There were a total of 12 circles which each size had four of the same. The final project turned out pretty good. We sanded all the circles and painted the circles different colors. Andrew had us write the math for the circles on the actual circle and we had made a display board that showed the different conic sections, the ellipse, parabola, hyperbola and of course the circles.
Dee and Donavan
Our project, The Asteroid, was a sculpture that involved a lot of patience and dedication. Made out of metal, yarn and wood, our sculpture successfully met the requirements in order for it to be “Calculicious”. At first, we thought that our piece was a hyperbola. However, once we finished, we noticed that our piece had a parabolic shape. We realized that after rotating about the coordinate axis, The Asteroid passed the vertical line test and was a parabolic function. Our piece also incorporates summation notation, the addition of a set of numbers. By creating and adding an infinite number of rectangles under a function, it is possible to find the area under the curve of the function. The creation of this masterpiece was not so easy. We had to drill over 100 holes into 3 metal bars, and weave yarn in and out each and every hole with precision in order to create the crossing effect in our sculpture. The outcome of our project turned out to be a great success. We are very proud of our work; we hope that our sculpture is not only aesthetically appealing, but can help inspire and teach others.
Our project, The Asteroid, was a sculpture that involved a lot of patience and dedication. Made out of metal, yarn and wood, our sculpture successfully met the requirements in order for it to be “Calculicious”. At first, we thought that our piece was a hyperbola. However, once we finished, we noticed that our piece had a parabolic shape. We realized that after rotating about the coordinate axis, The Asteroid passed the vertical line test and was a parabolic function. Our piece also incorporates summation notation, the addition of a set of numbers. By creating and adding an infinite number of rectangles under a function, it is possible to find the area under the curve of the function. The creation of this masterpiece was not so easy. We had to drill over 100 holes into 3 metal bars, and weave yarn in and out each and every hole with precision in order to create the crossing effect in our sculpture. The outcome of our project turned out to be a great success. We are very proud of our work; we hope that our sculpture is not only aesthetically appealing, but can help inspire and teach others.

Ana and Christen
The Mathtini was originally intended to consist of two perfectly made martini glasses. Ana and I were struck between two different methods of making the glasses. We couldn't decided whether we wanted to make them out of clear acryllic or glass blow them. Whichever method we chose, we did agree on one thing: we wanted the cups and bases to be perfectly conical. We had planned for the stems to be different shapes; one stem would be elliptical while the other took the shape of a sin wave.
Our idea then evolved into a series of martini glasses on a shelf, but we quickly realized that not only was the math for that idea minimal, it was not particularly impressive. Through working with Andrew and Jeff, we decided to continue on with the idea of a series of four martini glasses. However, the new idea was completely different than before. We planned on filling the glasses with colored epoxy, letting it try in different conical shapes. Those shapes being circles, ellipses, parabolas, and hyperbolas. When the final product was finished, it would appear as if the glass were falling. The first glass would be upright, and the epoxy would take shape of a circle. The second glass would be tilted slightly, as if it is starting to fall. The angle on the cup would transform the epoxy into an ellipse. The third glass would be tilted farther, turning the epoxy into a parabola. Lastly, in the final stage of the fall before it hit the ground, the epoxy would resemble a hyperbola.
All of our martini glasses are attached to a rectangular wooden plank, each one with math written on it that corresponds with the shape that the epoxy makes. We have written equations, examples of how to solve the equations, and pictures of the shapes that the liquid makes. One of the best parts of our martini glasses is the colored epoxy. In order to make the color we wanted, we took a clear cup and colored the bottom of the it with a sharpie. We would mix the epoxy into the cup, and eventually the ink would mix in, and we got the color we wanted.
The only problems we faced happened when we poured the epoxy into our martini glasses. The 2-ply epoxy we had wasn't meant to dry in huge volumes-it was designed to be spread thinly on wood as a varnish of sorts. When we poured the epoxy into our cups, the volume was way higher than it should have been and there was a huge exothermic reaction. The epoxy heated up to extreme temperatures, and at one point one of our classes was beginning to melt. We quickly learned to put our cups in an ice bath while the epoxy dried, in order to save further cups a hot death.
Jorge Corona
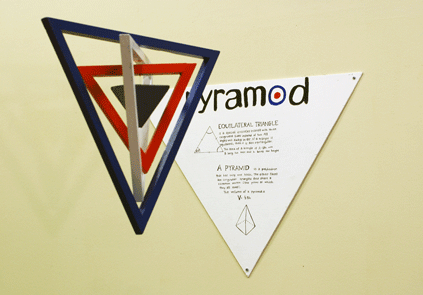
The sculpture that Jen and I made was called Pyramod. Our sculpture was inspired by the mod symbol which is something that I personally like a lot. The mod symbol is pretty much a target with the outside blue, the middle white, and the center dot red. The way we constructed our sculpture was by measuring pieces of wood and cutting them into three equal sizes in order to create a triangle. We made three triangles that were able to fit into each other and spin once they were attached by fishing wire. In the center of the pyramid was a pyramid that we made out of wood. We decided to incorporate this because we had the triangular theme going on in our sculpture and it fit perfectly. Even though our sculpture is very simple, it is very clean and direct. We talk about triangles and pyramids and what each of their formulas are. Overall I was very satisfied with our sculpture because I felt like we both contributed to it and I was able to put a large part of myself in it.
The sculpture that Jen and I made was called Pyramod. Our sculpture was inspired by the mod symbol which is something that I personally like a lot. The mod symbol is pretty much a target with the outside blue, the middle white, and the center dot red. The way we constructed our sculpture was by measuring pieces of wood and cutting them into three equal sizes in order to create a triangle. We made three triangles that were able to fit into each other and spin once they were attached by fishing wire. In the center of the pyramid was a pyramid that we made out of wood. We decided to incorporate this because we had the triangular theme going on in our sculpture and it fit perfectly. Even though our sculpture is very simple, it is very clean and direct. We talk about triangles and pyramids and what each of their formulas are. Overall I was very satisfied with our sculpture because I felt like we both contributed to it and I was able to put a large part of myself in it.
Deja and Mariah
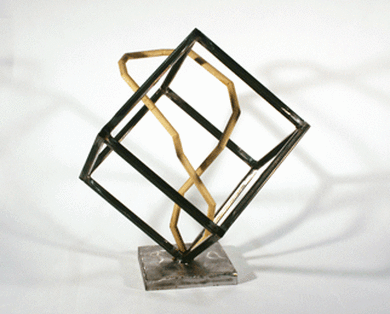
Seeking inspiration Deja and I perused the online collectives of two artists, Andy Goldsworthy and Francis Bacon. Andy Goldsworthy sculpts organic materials to create impermanent installations in natural landscapes. Francis Bacon paintings have a recurring theme of figures incased in three dimensional shapes. We emulated the movement in Andy Goldsworthy’s organic structures and the rigid three dimensional geometric framing of Francis Bacon’s paintings to create our sculpture. Our sculpture illustrates an organic shape made of wooden dowels winding through a steel welded cube, which is balanced upon a single corner. Our sculpture is indicative of the unsuspected strength an organic structure can have in contrast with the industrial. The organic shape appears is if it is breaking out of its industrial encasement.
Seeking inspiration Deja and I perused the online collectives of two artists, Andy Goldsworthy and Francis Bacon. Andy Goldsworthy sculpts organic materials to create impermanent installations in natural landscapes. Francis Bacon paintings have a recurring theme of figures incased in three dimensional shapes. We emulated the movement in Andy Goldsworthy’s organic structures and the rigid three dimensional geometric framing of Francis Bacon’s paintings to create our sculpture. Our sculpture illustrates an organic shape made of wooden dowels winding through a steel welded cube, which is balanced upon a single corner. Our sculpture is indicative of the unsuspected strength an organic structure can have in contrast with the industrial. The organic shape appears is if it is breaking out of its industrial encasement.
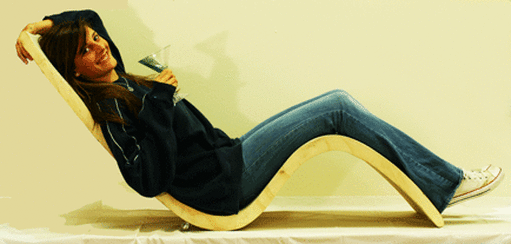
Gustavo and Miles
The idea for our sculpture came from miles. Miles had the idea to make a chair in the shape of a cosine wave. Soon after approaching Andrew Gloag about it we found that a cubic equation has a better shape that would be more comfortable for a person’s body. So we looked up different cubic equations and found one that would best fit our design. There were a few minor changes we had to do to the equation so that the apex of the curves would fit perfectly with the joints of someone’s body. After settling on our final design we began to build. We cut our twenty four cubic shaped pieces out of quarter inch plywood. After having cut all the pieces for the chair we glued them together. To get them smooth we spent countless ours sanding to get the chair as smooth as possible. The math that was involved with our sculpture was figuring out the roots of our cubic on a graph, we displayed these roots on the wall the night of exhibition.
The idea for our sculpture came from miles. Miles had the idea to make a chair in the shape of a cosine wave. Soon after approaching Andrew Gloag about it we found that a cubic equation has a better shape that would be more comfortable for a person’s body. So we looked up different cubic equations and found one that would best fit our design. There were a few minor changes we had to do to the equation so that the apex of the curves would fit perfectly with the joints of someone’s body. After settling on our final design we began to build. We cut our twenty four cubic shaped pieces out of quarter inch plywood. After having cut all the pieces for the chair we glued them together. To get them smooth we spent countless ours sanding to get the chair as smooth as possible. The math that was involved with our sculpture was figuring out the roots of our cubic on a graph, we displayed these roots on the wall the night of exhibition.

|
|
|
Nick and Jennica
My partner and I were having a tough time brainstorming an idea for our sculpture towards the beginning of the project. The first few weeks were particularly difficult because whenever one partner was at school, the other was out sick. After sitting down and finally having each other’s company, we came up with multiple blueprints for different sculptures. It wasn’t until I read up onIcosahedrons did we design our perfect sculpture. We decided to build anIcosahedron showing its Cartesian Coordinates using three pieces of pixie glass (red, green and blue) to represent the X and Y-Axis, wooden balls which we painted white to represent the coordinate points, and white string to connect them. We originally wanted to connect the wooden balls with copper rods but found that we were short on materials. I think the white string did us justice but better preparation on our behalf to make sure we had everything we needed before the building process may have resulted to the sculpture we envisioned in the beginning.
The math behind our sculpture wasn’t easy but Nick and I tried our best to understand it and incorporate the math concepts we were comfortable with. We knew that the Icosahedron was a Platonic Solid that had twenty triangular faces, thirty edges and twelve vertices. We also learned how to calculate the area and volume of the Icosahedron alongside its dimensions and Cartesian Coordinate Points.
My partnership with Nick wasn’t “perfect” but what matters is that we made it work. We both pulled our weight when it mattered the most and we wouldn’t have had such a successful final product if it were otherwise. Overall, I’m happy with how our sculpture turned out. We could have done some things differently during the building process but the most we can do now is learn from it!